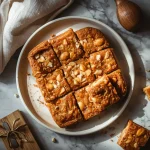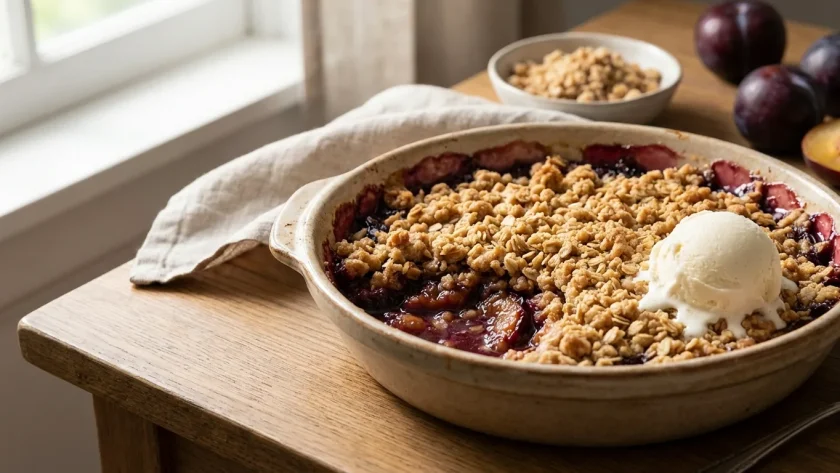
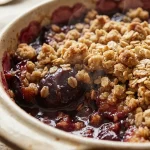
There’s something deeply comforting about a warm fruit dessert bubbling away in the oven. Ina Garten’s Plum Crisp is a perfect example of that rustic, homey magic. It combines tart, juicy plums with a buttery, crunchy oat topping for a dessert that feels both elegant and simple.
This recipe is a classic for a reason. It comes together in about 20 minutes of active prep and bakes for 45 minutes, filling your kitchen with the most incredible aroma. It’s the kind of dessert you can make for a casual weeknight treat or a relaxed weekend dinner party.
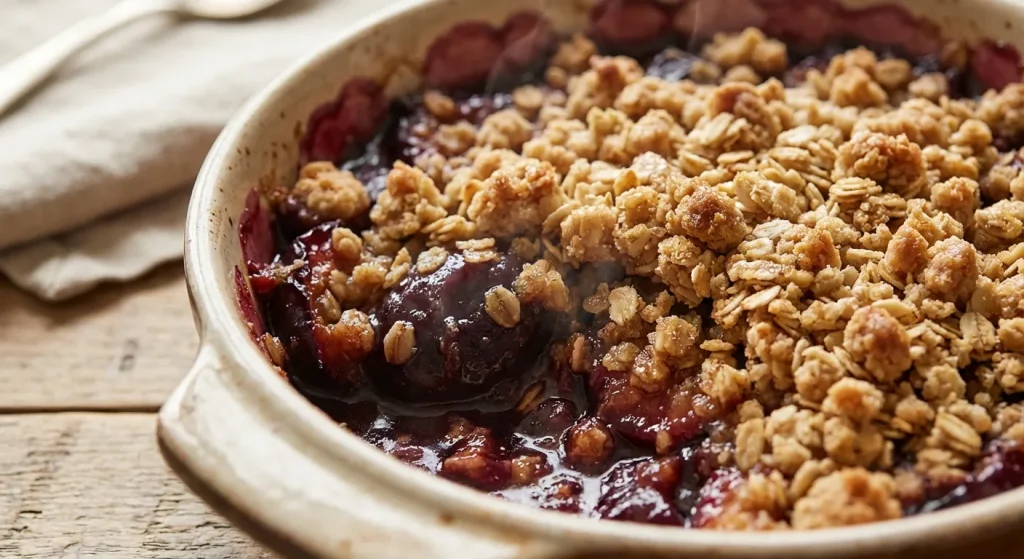
The beauty lies in the contrast: the jammy, slightly tangy fruit filling against the sweet, crisp streusel. Served warm with a scoop of vanilla ice cream, it’s pure comfort in a bowl. This is American home baking at its finest.
Ina Garten Plum Crisp Overview
At its heart, a fruit crisp is a simple, rustic dessert. It belongs to the same family as cobblers and crumbles, but its signature is the streusel-like topping made with oats. This version, inspired by Ina Garten’s approachable style, highlights the natural flavor of ripe plums.
What makes it special is the balance. The filling uses just enough sugar and a touch of lemon to enhance the plums’ tartness without masking it. The topping is generously buttery and bakes up into shards of golden-brown crunch. It’s a study in textures and a celebration of seasonal fruit.
Why This Recipe is Worth Trying
If you’re on the fence about making a fruit dessert, here’s what convinced me to keep this recipe in my regular rotation.
- Minimal Hands-On Time — The active work is mostly chopping and mixing. After about 20 minutes, it’s in the oven, leaving you free to clean up or prepare the rest of your meal.
- Forgiving Nature — Unlike a finicky pie crust, the streusel topping is very forgiving. You don’t need to be precise when working in the butter, which takes the pressure off.
- Celebrates Imperfect Fruit — This is the perfect destination for plums that are almost too ripe or slightly bruised. Baking transforms them into something glorious.
- Customizable Base — Once you master the topping formula, you can apply it to almost any fruit. It’s a template for endless summer and autumn desserts.
- Comfort Food Appeal — The warm, spiced aroma as it bakes is half the experience. It feels nostalgic and deeply satisfying to serve.
- Impressive Yet Easy — It looks and tastes like you spent hours, but the simplicity is our little secret. It’s a guaranteed crowd-pleaser.
Ingredients You’ll Need for This Recipe
Gathering your mise en place makes the process flow smoothly. Here’s what you need, broken down by component.
For the Fruit Filling
- 2 pounds ripe plums — This is about 8-10 medium fruits. Look for plums that yield slightly to gentle pressure; they have the best flavor and juiciness for baking.
- 1/3 cup granulated sugar — Sweetens the tart fruit. The amount is perfect for letting the plum’s character shine through without being overly sweet.
- 1 tablespoon cornstarch — This is the essential thickener. It absorbs the juices released during baking, creating a syrupy sauce instead of a watery one.
- 1 teaspoon finely grated lemon zest — Adds a bright, aromatic note that cuts through the richness. Use a microplane for the finest zest.
- 1 tablespoon fresh lemon juice — Provides necessary acidity to balance the sweetness and prevent the flavor from tasting flat.
- 1/4 teaspoon fine sea salt — A small amount heightens all the other flavors in the filling, making them pop.
For the Crisp Topping
- 3/4 cup all-purpose flour — Forms the base of the crumb structure. I use unbleached all-purpose for reliable results.
- 1/2 cup old-fashioned rolled oats — These are key for the classic crisp texture and a nutty flavor. Don’t use quick-cooking or instant oats, as they can become mushy.
- 1/2 cup light brown sugar, packed — Adds moisture and a deep, caramel-like sweetness to the topping.
- 1/4 cup granulated sugar — Combined with the brown sugar, it creates a perfectly balanced sweetness and helps the topping crisp up.
- 1/2 teaspoon ground cinnamon — The warm spice that makes the topping smell and taste like autumn. It’s a classic pairing with plums.
- 1/4 teaspoon fine sea salt — Crucial in the topping to offset the sweetness and butter, making it taste more complex.
- 1/2 cup (1 stick) cold unsalted butter — This must be cold and cubed. It creates steam pockets as it melts in the oven, leading to a flaky, crisp texture.
For Serving (Optional)
- Vanilla ice cream or whipped cream — The cold, creamy contrast to the warm crisp is non-negotiable in my book. A high-quality vanilla bean ice cream is sublime.
Useful Equipment
You likely have most of these tools already. A couple of them are worth highlighting for their specific roles.
- 9-inch Pie Dish or 8×8 Baking Dish — A deep-dish pie plate is my favorite for this. The sloped sides contain the bubbling fruit beautifully. A square baking dish works perfectly, too.
- Rimmed Baking Sheet — Placing your baking dish on this is a simple insurance policy. It catches any potential fruit juice bubble-overs and saves you from cleaning the oven.
- Large and Medium Mixing Bowls — You’ll need one for tossing the filling and a separate one for mixing the crumb topping. Glass or stainless steel are both great.
- Pastry Blender or Your Fingertips — For cutting the cold butter into the dry ingredients. A pastry blender is efficient, but using your fingertips (working quickly) gives you excellent control over the crumb size.
- Wire Cooling Rack — Essential for letting the crisp rest after baking. It allows air to circulate underneath, preventing a soggy bottom.
Steps to Make Ina Garten Plum Crisp
The process is straightforward, but a few key techniques ensure the best results. Follow these steps in order.
- Preheat and Prep — Heat your oven to 375°F / 190°C with a rack in the center. Grease your chosen baking dish. This moderate temperature is ideal for cooking the fruit through and browning the topping evenly.
- Prepare the Plums — Wash, dry, halve, and pit your plums. Cut each half into 3-4 wedges, aiming for pieces about 1-inch thick. Consistent size means everything cooks at the same rate.
- Make the Filling — In a large bowl, combine the plum wedges with the granulated sugar, cornstarch, lemon zest, lemon juice, and salt. Toss gently until every piece is coated and no dry cornstarch is visible.
- Transfer and Rest — Pour the plum mixture into your prepared dish, spreading it evenly. Let it sit for a few minutes while you make the topping. This allows the sugar to start pulling juice from the fruit.
- Mix Dry Topping Ingredients — In a medium bowl, whisk together the flour, oats, both sugars, cinnamon, and salt. Break up any lumps in the brown sugar for an even mix.
- Incorporate the Butter — Add the cold, cubed butter. Using a pastry blender or your fingertips, work the butter in until the mixture looks like coarse meal with some pea-sized butter lumps remaining. Cold butter is non-negotiable for a crisp result.
- Assemble — Sprinkle the crumb topping evenly over the plums. Don’t press it down! A loose, craggy layer bakes up the crispiest. It’s fine if some fruit peeks through.
- Bake — Place the dish on a rimmed baking sheet and bake for 40-45 minutes. You’re looking for actively bubbling fruit around the edges and a deep golden-brown topping.
- Cool Before Serving — This is the hardest but most important step. Let the crisp cool on a wire rack for at least 20-30 minutes. This allows the juices to thicken properly into a sauce.
- Serve Warm — Scoop into bowls, making sure to get plenty of the juicy bottom and the crisp top. Add a scoop of vanilla ice cream for the full experience.
What Went Wrong and How I Fixed It
I’ve made my share of fruit crisps over the years. Here are the pitfalls I’ve encountered and how to avoid them.
- Soggy Topping — This usually happens if the butter was too soft or melted. I now make sure my butter is straight-from-the-fridge cold and I work it in quickly with my hands.
- Watery Filling — Skipping the cornstarch or not letting the crisp rest after baking are the main culprits. The cornstarch needs those bubbling juices to activate, and the resting time lets it set.
- Burnt Edges, Raw Middle — An oven that runs too hot or a dish placed too high can cause this. I always use an oven thermometer and bake on the center rack for even heat.
- Topping Sinks In — If the fruit filling is too wet before baking, the heavy topping can sink. Letting the sugared fruit sit for 5-10 minutes helps, but also avoid over-mixing the filling and breaking down the fruit.
- Lack of Flavor — Forgetting the salt or lemon can make the whole dessert taste flat. That small amount of salt in both the filling and topping is a flavor amplifier, not an option.
- Tough Topping — Overworking the butter-flour mixture can develop the gluten in the flour, leading to a tough, dense topping. Stop as soon as you achieve that coarse meal texture.
Ways to Make Ina Garten Plum Crisp Healthier
If you’re looking for a lighter version, a few simple swaps can adjust the nutrition profile while keeping the spirit of the dessert intact.
- Reduce Added Sugar — You can often cut the granulated sugar in the filling by a tablespoon or two, especially if your plums are very sweet. The topping sugars are harder to reduce without affecting texture.
- Use Whole Wheat Flour — Swap half of the all-purpose flour in the topping for whole wheat pastry flour. It adds fiber and a nutty flavor that pairs well with the oats.
- Incorporate Nuts — Replace 1/4 cup of the flour with finely chopped almonds or walnuts. This adds healthy fats, protein, and a wonderful crunch.
- Opt for a Lighter Topping — For a less buttery version, you can reduce the butter to 6 tablespoons. The topping will be slightly drier and more crumbly, but still tasty.
- Serve with Yogurt — Instead of ice cream, try a dollop of thick, plain Greek yogurt. It provides a tangy contrast and a protein boost.
Alternative Ingredients for Ina Garten Plum Crisp
Don’t have plums or ran out of an ingredient? Here are reliable swaps that work beautifully.
- Plums → Peaches or Nectarines — Use an equal weight of sliced, pitted peaches or nectarines. They have a similar juicy texture and baking time.
- Plums → Mixed Berries — Try 2 pounds of a berry mix (blueberries, raspberries, blackberries). You may need to increase the cornstarch to 1 1/2 tablespoons as berries are extra juicy.
- All-Purpose Flour → Gluten-Free Flour Blend — Use a 1:1 gluten-free baking blend in the topping. Ensure your oats are certified gluten-free if needed.
- Rolled Oats → Chopped Nuts — If you can’t have oats, replace them with an equal amount of chopped pecans or almonds for a nutty crumble.
- Light Brown Sugar → Coconut Sugar — This is a direct 1:1 swap. Coconut sugar has a deeper, caramel-like flavor and a lower glycemic index.
- Butter → Cold Coconut Oil — For a dairy-free version, use refined coconut oil in solid form. The texture will be slightly different but still delicious.
What to Serve With Ina Garten Plum Crisp
This dessert is a star on its own, but the right accompaniments can turn it into a memorable finale.
- Vanilla Bean Ice Cream — The classic pairing for a reason. The cold, creamy vanilla melts into the warm crisp, creating the perfect bite.
- Fresh Whipped Cream — Lightly sweetened with a touch of vanilla, it’s a lighter but equally luxurious topping.
- Aged Cheddar Cheese — A small slice of sharp, aged cheddar on the side is a wonderful savory counterpoint to the sweet-tart fruit. It’s a traditional pairing for a reason.
- Hot Coffee or Tea — A cup of strong coffee or a pot of Earl Grey tea cuts the sweetness and makes the dessert feel like a proper occasion.
- Sparkling Wine
— A glass of Prosecco or a demi-sec Champagne complements the fruitiness and makes the whole meal feel celebratory.
- Caramel Sauce Drizzle — For the ultimate indulgence, warm up a little caramel sauce and drizzle it over the crisp and ice cream. It’s decadent and fantastic.
Best Tips for Ina Garten Plum Crisp
These are the little things I’ve learned that make a big difference in the final result.
- Cold Butter is Key — I can’t stress this enough. Take the butter straight from the fridge and cube it. It creates steam as it bakes, which gives the topping its essential flaky, crisp texture.
- Don’t Skip the Rest — Letting the baked crisp cool for 20-30 minutes is not a suggestion. It’s the step that allows the cornstarch-thickened juices to set into a proper sauce instead of a runny mess.
- Use a Baking Sheet — Always place your dish on a rimmed baking sheet. Plums are juicy, and bubble-overs happen. This simple step saves you from a smoky kitchen and a difficult oven clean-up.
- Mix Filling Gently — Toss the plums with the sugar and cornstarch just until coated. You want to avoid breaking down the fruit pieces, which can make the filling mushy.
- Embrace the Cragginess — When sprinkling the topping, don’t press it down or try to make it even. Those irregular, clumpy bits bake up into the best, crispiest bites.
- Test for Doneness with Bubbles — The best indicator is visual. Look for thick, active bubbling around the edges of the dish. That tells you the fruit is fully cooked and the juices are boiling.
- Choose Ripe but Firm Plums — Plums that are very soft will turn to mush. Look for fruit that yields slightly to gentle pressure but still holds its shape when cut.
Unique Takes on Ina Garten Plum Crisp
Once you’ve mastered the basic recipe, try one of these fun twists to keep things interesting.
- Add Warm Spices — Along with the cinnamon, add a pinch of cardamom or ginger to the topping for a more complex, aromatic flavor profile.
- Incorporate Citrus — Swap the lemon zest and juice for orange. The sweeter citrus pairs beautifully with plums and makes the dessert feel a bit brighter.
- Create a Nutty Crunch — Stir 1/3 cup of chopped pecans or sliced almonds into the dry topping ingredients before adding the butter for extra texture and flavor.
- Make Individual Servings — Divide the filling and topping among 4-6 ramekins. Reduce the baking time to 25-30 minutes. It’s a charming way to serve guests.
- Add a Hint of Booze — Toss the plum filling with a tablespoon of amaretto, bourbon, or Grand Marnier for a sophisticated, grown-up twist.
- Try a Savory-Sweet Combo — Add a few cracks of black pepper to the plum filling. It sounds unusual, but it enhances the fruit’s flavor in a really intriguing way.
How to Store Ina Garten Plum Crisp
Proper storage keeps your leftovers tasting great. Here’s how to handle it.
- Short-Term Refrigeration — Once completely cooled, cover the baking dish tightly with plastic wrap or transfer portions to an airtight container. It will keep in the fridge for up to 4 days.
- Freeze Before Baking — Assemble the crisp in a freezer-safe dish, wrap it tightly in a layer of plastic wrap followed by foil. Freeze for up to 3 months. Thaw overnight in the fridge before baking as directed, adding 5-10 extra minutes.
- Freeze Individual Portions — Scoop cooled crisp into single-serving containers for easy, ready-to-go desserts. Reheat directly from frozen in the microwave.
- Room Temperature Caution — Due to the fruit content, I don’t recommend leaving it out on the counter for more than a couple of hours after it has cooled.
How to Reheat Ina Garten Plum Crisp
Reheating properly restores that just-baked warmth and texture. My preferred method is the oven.
- Oven Method (Best for Texture) — Preheat your oven to 325°F / 163°C. Cover the dish with foil and warm for 15-20 minutes, or until heated through. This keeps the topping from over-browning.
- Microwave Method (Fastest) — Place a single portion in a microwave-safe bowl. Heat in 30-second bursts, stirring gently between bursts, until warm. The topping will soften, but it’s quick and convenient.
- Air Fryer Method (Great for Crispiness) — Place a portion in an air fryer-safe dish. Reheat at 300°F / 150°C for 3-5 minutes. This does an excellent job of re-crisping the topping.
FAQs
Can I use frozen plums for this crisp?
Yes, you can. Thaw them completely and drain off any excess liquid in a colander before using. You might need to increase the cornstarch by half a tablespoon to compensate for the extra moisture.
How long does Ina Garten Plum Crisp last in the fridge?
Stored properly in an airtight container, it will stay fresh for up to 4 days. The topping will soften over time, but the flavor will still be wonderful.
Can I make this crisp ahead of time?
Absolutely. You can assemble the entire dish, cover it tightly, and refrigerate it for up to 24 hours before baking. You may need to add 5-10 minutes to the baking time since it will be going into the oven cold.
My topping isn’t crispy. What happened?
The most common reasons are using softened butter, over-mixing the topping into a paste, or not baking it long enough. Ensure your butter is cold, stop mixing when it’s crumbly, and bake until you see deep golden-brown color and bubbling fruit.
Can I freeze Ina Garten Plum Crisp after it’s baked?
You can, though the topping will lose some of its crisp texture upon thawing and reheating. For best results, freeze it before baking as described in the storage section.
What’s the difference between a crisp, a crumble, and a cobbler?
A crisp contains oats in the topping (like this recipe), a crumble is usually just a flour, butter, and sugar streusel without oats, and a cobbler has a biscuit or cake-like topping dropped over the fruit.
Nutritional Breakdown (Per Serving)
Based on 1 serving, which is roughly one-quarter of the entire crisp, without ice cream.
- Calories: 580
- Protein: 5g
- Fat: 22g
- Carbohydrates: 96g
- Fiber: 4g
- Sugar: 68g
- Sodium: Around 300mg
Conclusion
This dessert has earned its place as a classic for good reason. It’s unfussy, deeply satisfying, and celebrates fruit in the most delicious way possible. The process is simple enough for a beginner but the result feels special every time.
I encourage you to give this Ina Garten Plum Crisp a try, especially when plums are at their peak. Share it with friends, savor it on a quiet evening, and enjoy the simple pleasure of a dessert made with care. Happy baking!
PrintIna Garten Plum Crisp
A classic, rustic dessert featuring juicy, tart plums baked under a buttery, crunchy oat topping. The contrast between the warm, jammy fruit and the crisp, golden-brown streusel is pure comfort. Perfect served warm with a scoop of vanilla ice cream.
- Prep Time: 20
- Cook Time: 45
- Total Time: 65
- Yield: 4 1x
- Category: Dessert
- Method: Baking
- Cuisine: American
Ingredients
- For the Fruit Filling:
- 2 pounds ripe plums (about 8–10 medium), pitted and cut into 1-inch wedges
- 1/3 cup granulated sugar
- 1 tablespoon cornstarch
- 1 teaspoon finely grated lemon zest
- 1 tablespoon fresh lemon juice
- 1/4 teaspoon fine sea salt
- For the Crisp Topping:
- 3/4 cup all-purpose flour
- 1/2 cup old-fashioned rolled oats
- 1/2 cup light brown sugar, packed
- 1/4 cup granulated sugar
- 1/2 teaspoon ground cinnamon
- 1/4 teaspoon fine sea salt
- 1/2 cup (1 stick) cold unsalted butter, cut into 1/2-inch cubes
- For Serving (Optional):
- Vanilla ice cream or lightly sweetened whipped cream
Instructions
- Preheat your oven to 375°F / 190°C. Position a rack in the center of the oven. This moderate temperature allows the fruit to soften and bubble gently while the topping browns evenly without burning. Grease a 9-inch pie dish, deep-dish pie plate, or 8×8-inch baking dish with butter or non-stick spray.
- Prepare the plums: Wash, dry, and halve the plums, removing the pits. Cut each half into 3-4 wedges, about 1-inch thick at the skin. Consistent sizing ensures even cooking. Place all the plum wedges in a large mixing bowl.
- Make the fruit filling: To the bowl with the plums, add 1/3 cup granulated sugar, 1 tablespoon cornstarch, 1 teaspoon lemon zest, 1 tablespoon lemon juice, and 1/4 teaspoon salt. The cornstarch will thicken the plum juices as they bake, while the lemon brightens the flavor. Gently toss with a rubber spatula until the plums are evenly coated and no dry cornstarch remains.
- Transfer the filling: Pour the coated plum mixture into the prepared baking dish, spreading it into an even layer. Scrape any sugary juices from the bowl over the top. Let this sit while you prepare the topping; this brief rest allows the sugar to begin drawing out moisture from the fruit.
- Combine the dry ingredients for the topping: In a separate medium bowl, whisk together 3/4 cup flour, 1/2 cup oats, 1/2 cup packed brown sugar, 1/4 cup granulated sugar, 1/2 teaspoon cinnamon, and 1/4 teaspoon salt. Whisk thoroughly to break up any lumps in the brown sugar and ensure the cinnamon and salt are evenly distributed.
- Incorporate the butter: Add the 1/2 cup of cold, cubed butter to the dry mixture. Using your fingertips, a pastry blender, or two forks, work the butter into the flour mixture until it resembles coarse meal with pea-sized lumps of butter remaining. The butter must be cold to create a flaky, crisp texture; if it melts prematurely, the topping will be greasy and dense.
- Assemble the crisp: Sprinkle the crumb topping evenly over the plum filling, covering it completely. Do not press or pack the topping down; a loose, craggy layer will bake up the crispiest. Some fruit will peek through, which is fine and allows steam to escape.
- Bake the crisp: Place the dish on a rimmed baking sheet (to catch any potential bubble-overs) and transfer to the preheated oven. Bake for 40-45 minutes, or until the fruit filling is actively bubbling around the edges and the topping is a deep, golden brown. The internal fruit temperature should reach about 200°F / 93°C for proper breakdown.
- Cool before serving: Remove the crisp from the oven and place it on a wire cooling rack. Let it rest for at least 20-30 minutes before serving. This critical resting time allows the bubbling fruit juices to thicken properly into a syrupy sauce. If served immediately, the filling will be too runny.
- Serve: Scoop the warm plum crisp into bowls. The ideal serving includes some of the juicy bottom fruit and plenty of the crisp, buttery topping. Top with a scoop of high-quality vanilla ice cream or a dollop of lightly sweetened whipped cream to complement the tartness of the plums.
Notes
Storage: Cool completely, then cover tightly with plastic wrap or transfer to an airtight container. Refrigerate for up to 4 days. Freezing: Assemble the crisp in a freezer-safe dish, wrap tightly in plastic and foil, and freeze for up to 3 months. Thaw overnight in the refrigerator before baking. Add 5-10 minutes to the baking time if starting from cold. Reheating: Reheat individual portions in the microwave in 30-second bursts until warm. For the whole crisp, reheat, covered with foil, in a 325°F / 163°C oven for 15-20 minutes, or until warmed through.
Nutrition
- Calories: 580
- Sugar: 68g
- Sodium: 300mg
- Unsaturated Fat: 13g
- Carbohydrates: 96g
- Fiber: 4g
- Protein: 5g
- Cholesterol: 55mg
Keywords: plum crisp, Ina Garten plum crisp, fruit crisp recipe, summer dessert, easy fruit dessert, baked plums, oat topping, rustic dessert, weeknight dessert, plum recipes, stone fruit dessert, buttery streusel